Showing posts with label sewing. Show all posts

Tuesday, February 9, 2016

8 Things Every Sewer Should Know - Join the Dover Jacket Sew-Along!


February is the time when I'm racing to finish up winter projects and at the same time looking ahead to some spring sewing.  It's not quite time for short sleeves but it is a good time to brush up on our skills in preparation for spring projects.  And if you're a new sewer, now's the time to learn some good foundational skills that'll launch you "armed and dangerous" into your new hobby.  So... join us for the Blue Dot Patterns Dover Jacket Sew-Along....8 Things Every Sewer Should Know.


The Dover Jacket View B is a loose fitting, 3/4 length sleeve jacket that is a versatile wardrobe builder.  It goes together quickly and is a great project for the beginning/intermediate sewist.  You will learn 8 basic sewing skills that'll not only make your garments look professional but will also help your garments go together more quickly and easily.  If you are new to garment sewing, this would be a great sew-along for you!

Here's what we are going to learn:
  1. Marking fabrics - 3 different techniques
  2. Interfacing - why we need it and and what kind we need
  3. Gathering - how do I get them even?
  4. Clipping - why?
  5. Understitching - what is it?
  6. Topstitching - "man, this makes things look better"
  7. Making Buttonholes - seriously, you can do it
  8. Sewing on Buttons by Machine - aren't you relieved it can be done?
Here's the schedule for the sew-along:

February 12 - Day #1: Selecting Fabric, Supplies and Choosing Pattern Size.
February 16 - Day #2: Preparing to Sew: Put Together the PDF, Cutting, Marking and Interfacing.
February 19 - Day #3: Constructing the Body of the Jacket: Gathering, Clipping and Understitching.
February 23 - Day #4: Finishing up: Topstitching, Buttonholes and Sewing on Buttons by Machine.

Here's the Sew-Along Badge if you'd like to add it to your blog:


Okay....let's get ready.  I can't wait to see what you make!

Friday, July 3, 2015

My New Yellow Dress


I don't think I've had a yellow dress since I was probably five.  It was yellow and red calico, had a smocked top and, get this, it had a matching swimsuit.  Yes folks, I was rockin' the seventies.  Well here is my new yellow dress without the swimsuit.  You can thank me later....


I've been wanting to make this pattern out of a lightweight chambray I found on a recent shopping to LA but this pattern got some iffy reviews and I decided it would be prudent to make a muslin first.  This linen has been lying around my sewing room for a while and although I love the color I never made anything out of it so I decided it was good for a muslin.


I love the pockets on Simplicity 6182 and been hoping to try the pattern for quite some time.  In pattern reviews, it gets poor marks for instructions primarily because it has you baste together the bodice first, fit it, then sew it back together.  I skipped that and made the bodice and fit it at the same time.  A few reviewers did remark there was "gaping" at the neckline (which is a problem I often have anyway) so I made the neckline smaller by slashing and folding in a "dart" on the bodice front pattern piece.  This change worked out very well, no gaping.


All in all the dress went together smoothly, I like the style and I LOVE the pockets.  They are so much fun.


Thursday, May 28, 2015

Happy Stripe Tee - Simplicity 1620


Like most of you out there, I'm constantly looking at patterns.  I feel like I've either seen, purchased or sewn just about every pattern out there.  So, I absolutely love when a blogger shares a project from a pattern I've seen a million times before and simply passed over.  My happy stripe tee uses one of those patterns.

The lovable Sunni from A Fashionable Stitch made a beautiful blouse from Simplicity 1620 and I immediately went out and bought the pattern.  Although Sunni's version is much more elegant than this one, this pattern is perfect for filling the cute t-shirt gap in my wardrobe.  I have plenty of basic tees from Target but I wanted a couple of shirts that were not quite so basic but still really comfy for the summer.


I purchased this fabric from a store that was closing because it looked so happy it almost said "Hi" as I walked by.  I made a size 12 and I changed the straight hem into a shirttail.  It looks much better when I wear it with pants.  Here's how I did it:


I made a mark 3" up from the hem at the side seam.


Using my French curve ruler (every sewer needs one and they are super cheap here), I made a curve from my line almost to the hem, then flipped the curve and continued the line all the way to the hem.  I repeated this on the other side and got this:


Looks like it was meant to be, right?

 
Knits can be a little unruly when trying to put a tiny hem in them, so I serged the bottom and used that as the guide for pressing in the hem.  I used a zigzag stitch to finish it off.


This entire top took less than two hours to make.  It's a quick victory which we need every now and again.


Here it is tucked into my favorite skirt (not a great picture but the Santa Ana winds were in full force when I took this picture so I had to take what I could get).


I've got more clothing projects on deck but believe it or not I need to finish a DC comics "Squirrel Girl" costume for my niece first.  Because every girl needs a squirrel girl costume...

What are you making?

Diane

Friday, October 24, 2014

Bargain Basement


The fabric bargain basement is a dark and twisty place you should not go alone.  That said, I know we all do it.  Me included.  I bought this green fabric in the "flat folds" area of a fabric store not far from here because it's a beautiful color and polka dots are the best.  It's a very lightweight rayon challis and was just $3 per yard and 60" wide.


I used a self drafted pattern and added a knit band to the sleeves.  When I was in college, I made a white woven top with light pink bands and just adored it.  I'm sure I wore it to shreds but I still wish I would've saved it.  This top is my "homage" to that college top.


The tricky part of the top was not the construction but the fabric.  When I got it home and started to lay it out I realized the pattern was printed off grain.  Not just off grain but OFF GRAIN.  Now I know why it landed in the bargain basement!

In the photo above, I cut the fabric on the crosswise grainline but if you look closely, the design and circles aren't straight.  This piece of fabric is 10" wide and the design is 3/4" off.  So on 60" wide fabric the design is almost 5" off crosswise. Yikes!

So...what does that mean?  Well, my top is on grain and lays straight but the print isn't.  It's subtle but it's there.  Thankfully the pattern has dots all over so it almost hides itself.


I still love it.  I still wear it.  It's dreamy soft and I love my "woven" sweatshirt.  Mistakes and all.  It'll be our little secret.


<a href="http://www.bloglovin.com/blog/5222481/?claim=bbsm3e5fnht">Follow my blog with Bloglovin</a>

Friday, August 8, 2014

Simplicity 2373 - Ojai Dress


Well...this is one of those projects that was difficult to get through.   I find this hard to believe since this is one of my TNT's (tried and true pattern) and some leftover linen I had in my stash.  I made the bodice and the straps and for some reason I just wasn't happy so I left it sitting on my cutting table for a day.  I have a stack of other projects I'm excited to start but I'm not a sewer that can have any unfinished projects lying around. I knew I'd have to figure out my problem or call it a "wadder" and trash the dress.  I forged ahead and I'm so glad I did.


I used the dress pattern from Simplicity 2373 and added a couple of inches to the bottom.  Since I was unhappy with the bodice, I decided to experiment with some decorative stitching and ended up using a technique I used on this skirt.  I hand wound light gray embroidery floss (all six threads) onto a bobbin and top stitched from the wrong side so the embroidery floss showed on the front.  So easy and yes, washable.


Here are my reviews on PatternReview.com. and Kollabora.


My daughter took these dress pictures on a recent trip to Ojai, California.  If you ever
can get there....do it.  It's a beautiful place.  We laid by the pool most of the day and this was my view.  Nice, right?  I can't wait to go back.


Saturday, April 5, 2014

Sweatshirt With No Sweat


I'm looking over my projects for the year so far and see that I've made quite a few tops!  I must be living in jeans because the new tops keep coming.  And here's yet another.  When I go in my closet I always want something cozy like a sweatshirt but don't want to wear a hoodie.  I decided it was time to make a sweatshirt pattern of my own.


This is round one of a new pattern I drafted and I like it because it's soft like a sweatshirt but doesn't look sloppy (or have to be dry cleaned like a sweater).  It has a scoop neck, dolman sleeve, and bands at the neck, sleeve and waist.  I used a reversible knit from Joann using the dot side for the body and stripe side for the bands.  I've since made it in hot pink ponte knit and did twin needle top stitching in white and made the neckline a little smaller.  I'm working on a purple jersey knit now and maybe that will be the final draft (but certainly not the final one....I want to do some color blocking).


These pictures were taken on my son's 14th birthday when we went down to the Beachcomber restaurant (you need to go if you're ever in So Cal) for beignets on the beach.  He was a very happy boy young man!


Thursday, January 30, 2014

Fabric Mixer


It’s always been a little taboo to mix knits and wovens in sewing but with the comfort of knits and the fun of wovens, I decided to break the rules and realize the best of both.  I wrote this post for the Fabricmart Fabrics blog in the hopes that others would do some mixing too.


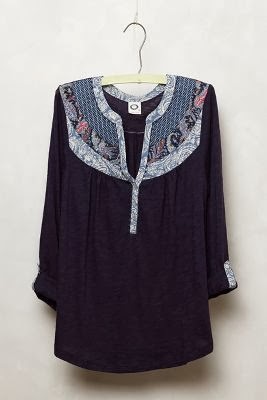
I’ve been drooling over this top from my Pinterest board for quite a while and I used it as my inspiration. I chose a super soft navy slub knit from Fabricmart Fabrics for the body of the blouse and rooted around in my scrap basket for the wovens for the yoke.  


I chose New Look pattern 6187 View C  because it’s a simple design with a yoke. When mixing knits and wovens, the wovens are best placed in the most stable parts of the top like the yoke, collar, cuffs and placket.  It helps keep the shape of the garment without losing the comfort.  For example, it’s nice to have a yoke that stays in place but a sleeve that stretches and moves.  


I made a few simple changes to the pattern.  
1.  Omitted the collar and lowered the neckline 1/2”, 
2.  Shortened the sleeve 4” and added elastic instead of a cuff.  
3.  Pieced the yoke out of scraps,  lined it in voile and added a fabric "tab" to the back of my blouse.
4.  Replaced the neck facing by lining the front yoke and binding the back neck with 2” knit strips (see the photo) and then sewing in the shoulder seam.

To make the hem lay smooth, I pressed 1/2" wide strips of knit interfacing to the hem, folded up the hem and used a twin needle to sew it in.


This was a fun project and it's comfortable and cheery.  I highly recommend breaking the rules and mixing it up!
Here are my reviews for Pattern Review.com and Kollabora.
Happy Mixing!

Saturday, January 11, 2014

2013 Roundup

Happy New Year!  It flew by fast didn't it?

My girlfriend has a journal where she writes down ideas and phrases she finds witty or important.  On New Year's Eve, when we get together with her family every year, she writes down the New Year's Resolutions of everyone at the table.   This year, it was fun to see how well we did....or didn't do.  And even more interesting to be reminded of the one's we forgot!

Well, here are mine from last year with the results:

  1. Sew 3 projects per month.  They can be anything but I mostly want to focus on garments and even more specifically on knits, pants and even some workout wear.  I did this for every month but April.  I made a few pairs of pants, worked on lots of knits but no workout wear.... 
  2. Run 3 half marathons.  I ran 2.
  3. Give away my "Penguins on the Beach" pajamas given to me by my dear friend Carolyn.  They are so worn they have to go!  But they're so comfy I don't want to let them go......but I will......this year.....I have all year right?  Yes, I gave them away....boo-hoo.

I didn't do everything I wanted but I am proud of what I did.

Here are my new resolutions for 2014:

  1.  Sew 3 projects per month (this was the most fun I've ever had with a resolution so I'm doing it again).
  2. Run the La Jolla Half Marathon.
  3. Take better care of my hands.  I know this one sounds stupid but my hands are so dry they look like velociraptor claws.  With all the sewing, cleaning and cooking we do our hands take a beating!  Is anyone with me on this?
  4. Be more thoughtful with others.  One random day, my girlfriend brought me a box of Good and Plenty for no reason.  It made my day.  My husband eats trail mix almost every day and sometimes he saves the M&M's for me.    I think this is the sweetest thing (no pun intended) anyone could do.  My daughter brushes my hair and it's a little thing that makes all my troubles go away.  I need to do more things like this.....
My sewing highlight for 2013 was far and away competing in Fabricmart's  Fabricista Challenge.  It was a couple of months in the fall and it challenged me to learn new techniques, make pieces I wouldn't normally make and work under deadlines I normally don't give myself.  I loved it!  But the best part about it was the support I got from my family and friends.  I felt very loved.

I'm just finishing my first garment of 2014 and I can't wait to share....

Happy 2014 everyone!  Let's make it a creative one!

Sunday, December 1, 2013

Burda 8292 - Final Challenge Coat

One of my favorite projects from the Fabricista challenge was the coat I made for the finale.  


I used Burda Pattern 8292 and you can read about my contest entry and check out my Kollabora review.  And I want to publish my Pattern Review here for any of you who are interested in making it.  I can say that Burda pattern instructions assume quite a bit of sewing knowledge so I wouldn't recommend it to a beginner but for those with coat construction knowledge, the pattern pieces went together beautifully.

Here's the review:

Pattern Description: 
Fully lined coat with panel seams and seam or patch pockets.
Pattern Sizing:
Misses 8-22.  I made a 12.
Did it look like the photo/drawing on the pattern envelope once you were done sewing with it?
Yes
Were the instructions easy to follow?
Burda instructions were not detailed and difficult to follow. The pattern pieces went together well but I didn't follow the instructions.
What did you particularly like or dislike about the pattern?
This coat has classic style and a beautiful collar.
Fabric Used:
I used a cotton/spandex sateen and a solid red silk/cotton lining.
Pattern alterations or any design changes you made:
I made view E with inseam pockets instead of patch and made a 3/4 length sleeve.
Would you sew it again? Would you recommend it to others?
I would definitely make this again.


Friday, November 22, 2013

Simplicity 2365 - The Pattern Mixer Dress

For the FabricMart Fabricista Challenge we were charged with making a garment using two print fabrics.  This turned out to be a really fun project because as a fabricoholic, buying fabric prints feeds my soul.

I went to Fabricland in Orange and lying in the counter were these two fabrics.  Even though they weren't coordinates I knew right away I had to have them!  I used Simplicity 2365 and changed it quite a bit. 


I lengthened it into a dress and cut the center front piece in two, making a center front upper and lower piece.  I then pleated the Joel Dewberry rayon dot fabric and then cut the upper center front piece.  I added vintage buttons to the front and made a self tie.  It was really fun to make and the large floral print is an Amy Butler voile which was a dream to sew on. 


You can read more about the Fabricista Challenge entry here and my Kollabora review here.  And here's my pattern review:

Pattern Description: Misses' sewing pattern tunic in two lengths with front variations. Pattern Sizing:6-24. I made a size 12Did it look like the photo/drawing on the pattern envelope once you were done sewing with it?Yes....but I lengthened it to make a dress.Were the instructions easy to follow?Yes.What did you particularly like or dislike about the pattern?It's very versatile.Fabric Used:Amy Butler Voile and a Joel Dewberry Rayon.Pattern alterations or any design changes you made:I cut the center front piece in two so it added a front yoke. I pleated the dot rayon fabric and then cut the the upper center front pattern piece. I added a delicate trim and vintage buttons. I lengthened the the tunic to make a dress and added a self tie.Would you sew it again? Would you recommend it to others?
Yes. I made it once before and loved it.  

Saturday, October 26, 2013

Challenge #5 - I Won!


I won!  Thank you for all of your support in this challenge!

I'm off to work on Challenge #6.....

Sunday, October 20, 2013

Fabricista Sewing Challenge #5 - Timeless Classics

So here it is..... project #5 in the Fabric Mart Fabricista Challenge. Here's the challenge:

Challenge: Sewing a garment from a vintage pattern is challenging. The pintucks, pleats, and precise fit can be difficult to master. Choose a vintage pattern and modernize the piece. You can modernize your piece with styling, embellishment, or fabric. 
You will be judged on difficulty, craftsmanship, how fashion forward your look is, and FIT!
Take your time, you will have two weeks to make it perfect!


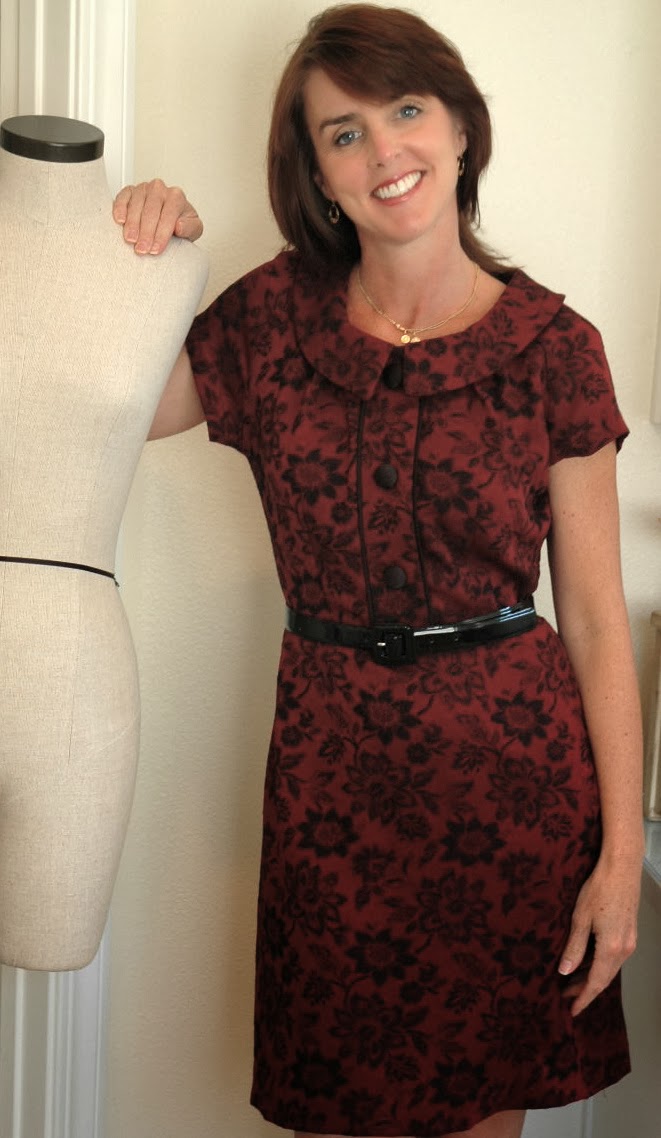
We were given two weeks to complete this challenge and I needed it.  I pulled this rayon blend brocade out of my stash and thought it was the perfect (and thankfully softer and drapier) homage to the brocades of the sixties. 


Since time is of the essence in these challenges, I immediately hit the internet for a vintage pattern and found a beautiful one at Retromonkey on Etsy and they shipped it quick (same day.....thank you so much!).  One of my favorite parts of this challenge was opening the pattern.  All of the pieces were there and had been meticulously cut and marked by the previous seamstress.  I know it's nerdy but it made me happy to use a pattern that someone else had taken such care with.  Sewing is an amazing tradition.   


Fit is one of the criteria for judging so I took my time making sure it was just right.  I lowered the neckline, widened the collar and made a slight aline skirt with darts instead of pleats (much more flattering on my body.)  I put in a side seam invisible zipper and shortened the sleeve from the original pattern. 


For detail I added a front placket with peau de soie piping and covered buttons.  I matched the fabric on the fronts and placket so the entire bodice is one continuous design.  Although I made all of these changes I still feel that I stayed true to the "wiggle dress" feeling of the pattern while making the dress wearable for me.  I'm not a sewer to sew something for sewing's sake....I wanna wear it.


 My constant sewing companion, Jack.  He loves retro dresses!


Please take a look at all of the other submissions from some very talented ladies at the Fabric Mart Blog.  Voting starts Tuesday.

I can't thank all of you enough for your kind comments and encouragement.  It's been a great experience!  By the way, editing all of these photos of myself has been quite painful.  It's been difficult to crop out saggy elbow skin (why didn't you tell me?) and frizzy hair.   To my dear friends:  I want to both thank you for not telling me how bad it is and reprimand you for not being real friends and nominating me for a makeover or at least a deep hair conditioning.  


All my best,

Diane