Thursday, January 30, 2014

Fabric Mixer


It’s always been a little taboo to mix knits and wovens in sewing but with the comfort of knits and the fun of wovens, I decided to break the rules and realize the best of both.  I wrote this post for the Fabricmart Fabrics blog in the hopes that others would do some mixing too.
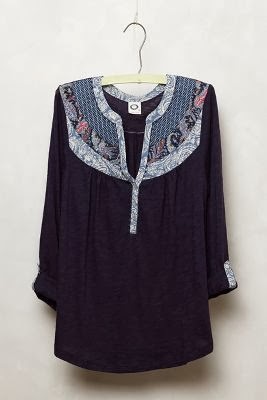

I’ve been drooling over this top from my Pinterest board for quite a while and I used it as my inspiration. I chose a super soft navy slub knit from Fabricmart Fabrics for the body of the blouse and rooted around in my scrap basket for the wovens for the yoke.  


I chose New Look pattern 6187 View C  because it’s a simple design with a yoke. When mixing knits and wovens, the wovens are best placed in the most stable parts of the top like the yoke, collar, cuffs and placket.  It helps keep the shape of the garment without losing the comfort.  For example, it’s nice to have a yoke that stays in place but a sleeve that stretches and moves.  


I made a few simple changes to the pattern.  
1.  Omitted the collar and lowered the neckline 1/2”, 
2.  Shortened the sleeve 4” and added elastic instead of a cuff.  
3.  Pieced the yoke out of scraps,  lined it in voile and added a fabric "tab" to the back of my blouse.
4.  Replaced the neck facing by lining the front yoke and binding the back neck with 2” knit strips (see the photo) and then sewing in the shoulder seam.

To make the hem lay smooth, I pressed 1/2" wide strips of knit interfacing to the hem, folded up the hem and used a twin needle to sew it in.


This was a fun project and it's comfortable and cheery.  I highly recommend breaking the rules and mixing it up!
Here are my reviews for Pattern Review.com and Kollabora.
Happy Mixing!

Friday, January 17, 2014

Ooooo....Fed Ex Brought a Box!

Fed Ex came with a box for me.  I used my gift certificate from Fabricmart and treated myself to some new fabric.  It's my birthday today and I think I'm going to celebrate by diving in!

I went against my usual fabric shopping advice....don't buy more than a couple of pieces because it gets overwhelming but, I couldn't resist...they were having a sale.  I bought two voiles, a lightweight gauze print, a gauze solid with sequins (oooo so pretty), a charcoal twill and two knits.  The navy knit is on deck today with inspiration from Anthropologie.  Yay!  


Have a great day!

Saturday, January 11, 2014

2013 Roundup

Happy New Year!  It flew by fast didn't it?

My girlfriend has a journal where she writes down ideas and phrases she finds witty or important.  On New Year's Eve, when we get together with her family every year, she writes down the New Year's Resolutions of everyone at the table.   This year, it was fun to see how well we did....or didn't do.  And even more interesting to be reminded of the one's we forgot!

Well, here are mine from last year with the results:

  1. Sew 3 projects per month.  They can be anything but I mostly want to focus on garments and even more specifically on knits, pants and even some workout wear.  I did this for every month but April.  I made a few pairs of pants, worked on lots of knits but no workout wear.... 
  2. Run 3 half marathons.  I ran 2.
  3. Give away my "Penguins on the Beach" pajamas given to me by my dear friend Carolyn.  They are so worn they have to go!  But they're so comfy I don't want to let them go......but I will......this year.....I have all year right?  Yes, I gave them away....boo-hoo.

I didn't do everything I wanted but I am proud of what I did.

Here are my new resolutions for 2014:

  1.  Sew 3 projects per month (this was the most fun I've ever had with a resolution so I'm doing it again).
  2. Run the La Jolla Half Marathon.
  3. Take better care of my hands.  I know this one sounds stupid but my hands are so dry they look like velociraptor claws.  With all the sewing, cleaning and cooking we do our hands take a beating!  Is anyone with me on this?
  4. Be more thoughtful with others.  One random day, my girlfriend brought me a box of Good and Plenty for no reason.  It made my day.  My husband eats trail mix almost every day and sometimes he saves the M&M's for me.    I think this is the sweetest thing (no pun intended) anyone could do.  My daughter brushes my hair and it's a little thing that makes all my troubles go away.  I need to do more things like this.....
My sewing highlight for 2013 was far and away competing in Fabricmart's  Fabricista Challenge.  It was a couple of months in the fall and it challenged me to learn new techniques, make pieces I wouldn't normally make and work under deadlines I normally don't give myself.  I loved it!  But the best part about it was the support I got from my family and friends.  I felt very loved.

I'm just finishing my first garment of 2014 and I can't wait to share....

Happy 2014 everyone!  Let's make it a creative one!

Tuesday, December 17, 2013

More Christmas Sewing.....Journals


I'm continuing my Christmas sewing and this year I made some journal covers for my friends.  These are easy and fun to make and don't take a whole lot of supplies.  I use a composition notebook for the inside so it's easy to replace when it's full.  It was fun to go to the fabric store for this project because I was able to pick a different fabric for each of my friends.  The one I'm using here is for my best friend....purple always reminds me of her.  

Here's here's how I made them:

Supplies:
1/3 yard of fabric
24" ribbon
1/3 yard of fusible fleece
Thread to match
Composition Notebook

Cutting:
Fabric: cut 2 pieces 11" x 16 3/4" and 2 pieces 11" x 4"
Fleece: cut 1 piece 11" x 16 3/4"
Ribbon: cut 2 pieces 12"


Fuse fleece to wrong side of one of the large fabric pieces to make the outer journal cover.  On both smaller fabric pieces fold over a hem on one long side of each piece (see photo).


Stitch hem in place.


Baste ribbon to outer journal, centering it on either side.


Place hemmed pieces right sides together over outer journal, matching raw edges along sides.  Stitch in place using 1/2" seam allowance.


Place remaining fabric on top of outer journal, right sides together, pin in place.  Stitch, leaving open 3" along one side for turning.  I like to mark my start and stop place with double pins to remind myself.


Cut corners off to reduce bulk. 


Turn right side out and give it a good press.


Yay!  You're done!
You could also embroider, piece, appliqué or anything else on the front to make it fun. I hope you enjoy it.  


Monday, December 16, 2013

Brown Paper Packages Tied Up With String

I'm almost finished with my Christmas sewing, my shopping is complete and I'm starting to get some wrapping done.  I love the wrapping part.....and I thought these looked cute....especially if you're a sewer.  I bought each of my sewing students a pattern that is a style they've either said they want to make or requires a skill they'd like to learn (i.e. zipper, buttons, sewing with knits etc.) the then I topped it off with a button (vintage or new) that reminds me of them.  I hope they like it!

Tuesday, December 10, 2013

Christmas Treat Bags

It's that time of year....for Christmas DIY gifts!  Yay!  Here are come Christmas treat bags I made for food gifts for my neighbors.  Pretend they're filled with salted caramel almond pretzel popcorn, mmmmm.  If you were one of my neighbors I'd give you one!  I think it's safe to share it here because I don't think any of my neighbors read my blog.


I have always admired this "Skinny Santa" embroidery design from Urban Threads and I'm so glad I finally got to use it.  You can make these bags out of any quilting weight fabric.  I got 10 bags out of 2 yards of fabric.

If you're interested here's how I made them:

Cut two pieces of fabric 9" x 14".  I used a lime green striped flannel some lady was holding in her hand at the fabric store.  I grabbed it when she was finished (I hope it didn't make me look desperate).  Flannel is an unlikely choice but I love it!


Optional:  Embroider design. (I placed the center of my design 8" down from the top and in the middle of the width.  I used the "Skinny Santa" design in the small size and increased it's size on my embroidery machine by 10%.  Look....he's waving at you.


With rights sides together, stitch both sides and bottom with a 1/2" seam allowance.


Here's the tricky part:  To make the gusset, pull front a back apart from each other at bottom corner. Put side seam right sides together along bottom seam, forming a triangle.


With a fabric marker, draw a line 1" in from the point of the triangle as shown.  Stitch along the line.  Repeat on the other side.


Fold down top 3" (or whatever amount you need for the size bag you need) and press.

Turn right side out and do a final press.

And now fill it with this recipe!  Yummmmm.


Merry Christmas Friends!

Sunday, December 1, 2013

Burda 8292 - Final Challenge Coat

One of my favorite projects from the Fabricista challenge was the coat I made for the finale.  


I used Burda Pattern 8292 and you can read about my contest entry and check out my Kollabora review.  And I want to publish my Pattern Review here for any of you who are interested in making it.  I can say that Burda pattern instructions assume quite a bit of sewing knowledge so I wouldn't recommend it to a beginner but for those with coat construction knowledge, the pattern pieces went together beautifully.

Here's the review:

Pattern Description: 
Fully lined coat with panel seams and seam or patch pockets.
Pattern Sizing:
Misses 8-22.  I made a 12.
Did it look like the photo/drawing on the pattern envelope once you were done sewing with it?
Yes
Were the instructions easy to follow?
Burda instructions were not detailed and difficult to follow. The pattern pieces went together well but I didn't follow the instructions.
What did you particularly like or dislike about the pattern?
This coat has classic style and a beautiful collar.
Fabric Used:
I used a cotton/spandex sateen and a solid red silk/cotton lining.
Pattern alterations or any design changes you made:
I made view E with inseam pockets instead of patch and made a 3/4 length sleeve.
Would you sew it again? Would you recommend it to others?
I would definitely make this again.