Tuesday, December 17, 2013

More Christmas Sewing.....Journals


I'm continuing my Christmas sewing and this year I made some journal covers for my friends.  These are easy and fun to make and don't take a whole lot of supplies.  I use a composition notebook for the inside so it's easy to replace when it's full.  It was fun to go to the fabric store for this project because I was able to pick a different fabric for each of my friends.  The one I'm using here is for my best friend....purple always reminds me of her.  

Here's here's how I made them:

Supplies:
1/3 yard of fabric
24" ribbon
1/3 yard of fusible fleece
Thread to match
Composition Notebook

Cutting:
Fabric: cut 2 pieces 11" x 16 3/4" and 2 pieces 11" x 4"
Fleece: cut 1 piece 11" x 16 3/4"
Ribbon: cut 2 pieces 12"


Fuse fleece to wrong side of one of the large fabric pieces to make the outer journal cover.  On both smaller fabric pieces fold over a hem on one long side of each piece (see photo).


Stitch hem in place.


Baste ribbon to outer journal, centering it on either side.


Place hemmed pieces right sides together over outer journal, matching raw edges along sides.  Stitch in place using 1/2" seam allowance.


Place remaining fabric on top of outer journal, right sides together, pin in place.  Stitch, leaving open 3" along one side for turning.  I like to mark my start and stop place with double pins to remind myself.


Cut corners off to reduce bulk. 


Turn right side out and give it a good press.


Yay!  You're done!
You could also embroider, piece, appliqué or anything else on the front to make it fun. I hope you enjoy it.  


Monday, December 16, 2013

Brown Paper Packages Tied Up With String

I'm almost finished with my Christmas sewing, my shopping is complete and I'm starting to get some wrapping done.  I love the wrapping part.....and I thought these looked cute....especially if you're a sewer.  I bought each of my sewing students a pattern that is a style they've either said they want to make or requires a skill they'd like to learn (i.e. zipper, buttons, sewing with knits etc.) the then I topped it off with a button (vintage or new) that reminds me of them.  I hope they like it!

Tuesday, December 10, 2013

Christmas Treat Bags

It's that time of year....for Christmas DIY gifts!  Yay!  Here are come Christmas treat bags I made for food gifts for my neighbors.  Pretend they're filled with salted caramel almond pretzel popcorn, mmmmm.  If you were one of my neighbors I'd give you one!  I think it's safe to share it here because I don't think any of my neighbors read my blog.


I have always admired this "Skinny Santa" embroidery design from Urban Threads and I'm so glad I finally got to use it.  You can make these bags out of any quilting weight fabric.  I got 10 bags out of 2 yards of fabric.

If you're interested here's how I made them:

Cut two pieces of fabric 9" x 14".  I used a lime green striped flannel some lady was holding in her hand at the fabric store.  I grabbed it when she was finished (I hope it didn't make me look desperate).  Flannel is an unlikely choice but I love it!


Optional:  Embroider design. (I placed the center of my design 8" down from the top and in the middle of the width.  I used the "Skinny Santa" design in the small size and increased it's size on my embroidery machine by 10%.  Look....he's waving at you.


With rights sides together, stitch both sides and bottom with a 1/2" seam allowance.


Here's the tricky part:  To make the gusset, pull front a back apart from each other at bottom corner. Put side seam right sides together along bottom seam, forming a triangle.


With a fabric marker, draw a line 1" in from the point of the triangle as shown.  Stitch along the line.  Repeat on the other side.


Fold down top 3" (or whatever amount you need for the size bag you need) and press.

Turn right side out and do a final press.

And now fill it with this recipe!  Yummmmm.


Merry Christmas Friends!

Sunday, December 1, 2013

Burda 8292 - Final Challenge Coat

One of my favorite projects from the Fabricista challenge was the coat I made for the finale.  


I used Burda Pattern 8292 and you can read about my contest entry and check out my Kollabora review.  And I want to publish my Pattern Review here for any of you who are interested in making it.  I can say that Burda pattern instructions assume quite a bit of sewing knowledge so I wouldn't recommend it to a beginner but for those with coat construction knowledge, the pattern pieces went together beautifully.

Here's the review:

Pattern Description: 
Fully lined coat with panel seams and seam or patch pockets.
Pattern Sizing:
Misses 8-22.  I made a 12.
Did it look like the photo/drawing on the pattern envelope once you were done sewing with it?
Yes
Were the instructions easy to follow?
Burda instructions were not detailed and difficult to follow. The pattern pieces went together well but I didn't follow the instructions.
What did you particularly like or dislike about the pattern?
This coat has classic style and a beautiful collar.
Fabric Used:
I used a cotton/spandex sateen and a solid red silk/cotton lining.
Pattern alterations or any design changes you made:
I made view E with inseam pockets instead of patch and made a 3/4 length sleeve.
Would you sew it again? Would you recommend it to others?
I would definitely make this again.


Friday, November 22, 2013

Simplicity 2365 - The Pattern Mixer Dress

For the FabricMart Fabricista Challenge we were charged with making a garment using two print fabrics.  This turned out to be a really fun project because as a fabricoholic, buying fabric prints feeds my soul.

I went to Fabricland in Orange and lying in the counter were these two fabrics.  Even though they weren't coordinates I knew right away I had to have them!  I used Simplicity 2365 and changed it quite a bit. 


I lengthened it into a dress and cut the center front piece in two, making a center front upper and lower piece.  I then pleated the Joel Dewberry rayon dot fabric and then cut the upper center front piece.  I added vintage buttons to the front and made a self tie.  It was really fun to make and the large floral print is an Amy Butler voile which was a dream to sew on. 


You can read more about the Fabricista Challenge entry here and my Kollabora review here.  And here's my pattern review:

Pattern Description: Misses' sewing pattern tunic in two lengths with front variations. Pattern Sizing:6-24. I made a size 12Did it look like the photo/drawing on the pattern envelope once you were done sewing with it?Yes....but I lengthened it to make a dress.Were the instructions easy to follow?Yes.What did you particularly like or dislike about the pattern?It's very versatile.Fabric Used:Amy Butler Voile and a Joel Dewberry Rayon.Pattern alterations or any design changes you made:I cut the center front piece in two so it added a front yoke. I pleated the dot rayon fabric and then cut the the upper center front pattern piece. I added a delicate trim and vintage buttons. I lengthened the the tunic to make a dress and added a self tie.Would you sew it again? Would you recommend it to others?
Yes. I made it once before and loved it.  

Thursday, November 21, 2013

Winner of the FabricMart Fabricista Challenge!


Shannon from ShanniLoves is the winner of FabricMart's Fabricista Challenge.  She did a beautiful job on her outfit and.....I loved her color choice!  I am honored to have won second place.  Kathy from KathySews came in third and I plan on copying that jacket she made (I hope she doesn't mind) in the final round.  It's adorable!  I had so much fun and I learned so much.  I'm off to do some of my own sewing now including sewing up some of the beautiful silks I won in the challenge.  I have pattern reviews coming for many of the pieces I made in the contest so check back.  Thank you for all of the support and I hope it inspired some of you to sew!

Monday, November 18, 2013

The Final Challenge! Yay!

This is my final entry in the FabricMart Fabricista challenge.  I can't believe I made it this far.  I have thoroughly enjoyed participating in these challenges and seeing what the other seamstresses make.  It's made me a better seamstress, stimulated my creativity and boosted my wardrobe!  I want to thank everyone at FabricMart for this opportunity and I particularly want to thank all of the ladies who have participated.  Your work inspires me!

Three seamstresses are completing in this challenge including Kathy from KathySews and Shannon from ShanniLoves.

Here's the challenge:

Create 3 pieces that can be worn together as one outfit or 2 outfits that could be worn to the same event. Using the Pantone Fall Color Chart, select 2 fall colors to inspire your outfit. 
You will be judged on creativity, craftsmanship, use of color, and fit.


Back in jr. high, my dear friend Adi (who is still my dear friend) complimented me on my purple pants.  Any compliment given to an insecure jr high kid is a treasure but for me, this was really big since....I had two pair.  Some may think it was excessive to have had two fifths of my pant wardrobe be purple but for me (and many other girls I would imagine) purple is a neutral.  When I saw purple on the Pantone color chart I knew I needed to head back to my fashion "roots" and make some updated purple pants.


For this final challenge, I chose acai (Pantone purple) and samba (Pantone red) to put a twist on a classic outfit every girls needs: a trench coat, chinos and blouse.  The fully lined cotton sateen coat was inspired by a Marc Jacobs print trench and has a large rounded collar and trim on the 3/4 length sleeves and placket. It's lined in a red silk/cotton blend and the lining and facings are piped with black ric rac.


Marc Jacobs Trench
The slim chino pants are made from a purple stretch cotton with two welt pockets on the back and a curved waistband.  I chose white for the blouse to make a play on the classic white shirt and to make the jacket "pop".  The sleeveless shell has pleats at the center front and is finished with french seams, self bias binding and pleated trim around the neckline.


Check out all of the fantastic Fabricista entries at the FabricMart blog and vote!

And a super special "thank you" to my family for helping with pictures and never complaining about the whirring of the sewing machine late at night.  I'm really sorry for all of the pins on the floor.  I hope I didn't cause any permanent damage to your feet!


Photo Bomber!  She makes me laugh!


Saturday, November 16, 2013

The Final Challenge Announced

The 8th and final project in the Fabricmart Fabricista Challenge has been announced.  Here it is:


3 Piece Outfit/Collection

3 Seamstresses will compete in this challenge.
You will have two weeks to complete this challenge.
Challenge: Create 3 pieces that can be worn together as one outfit or 2 outfits that could be worn to the same event. Using the Pantone Fall Color Chart, select 2 fall colors to inspire your outfit. 
You will be judged on creativity, craftsmanship, use of color, and fit. 

The First Place Winner will receive $25.00 a month for one year to spend on fabric at Fabric Mart (worth $300!) Plus! You will become a Fabricista on our blog!

The Second Place Winner will receive a $100 Gift Certificate and a Julie's Picks Membership. 

The Third Place Winner will receive a $50 Gift Certificate and Julie's Picks Membership.


Well....I picked my colors and I'm busy sewing like crazy.  I'll post my outfit Monday!

Thursday, November 7, 2013

I Won the Seventh Challenge!

I won the seventh challenge in the FabricMart Fabricista contest.  We are now starting the final challenge.  I'm really excited!  Thanks for all the support.

Sunday, November 3, 2013

Fabricista Challenge #7 - Mixing Prints


I can't believe we are on Challenge #7!  

Here's the new challenge from the Fabricistas at FabricMart Fabrics:

Challenge: Using at least two prints, coordinate them to make an outfit. Use only the fabric prints you have chosen to make your pieces. Think about where you would wear your fun outfit and choose a theme for your photo shoot. 
You will be judged on creativity, craftsmanship, how well your prints work together, your images, garment personality, and fit.
Someone very wise once said to me "Every American should collect something."  I never asked him to clarify what he meant but it was freeing for me because in my heart I've always been a collector.  My collections have brought me pleasure both in the process of collecting and in the enjoyment of owning. So for all of you out there.....I'm not a fabric hoarder.

I'm a fabric collector. 

It sounds classier doesn't it?  So for this challenge I had the pleasure of "collecting" two fabric prints and making a dress to go antique collecting.  You want to be me, right?
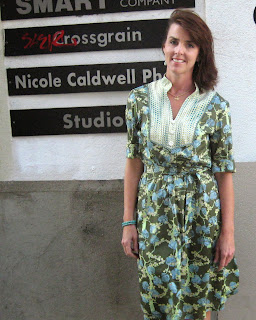
The quaint circle, historic buildings and charming treasures of the Old Towne Orange Antique District provided inspiration for this vintage inspired shirtdress.  I mixed a 100% rayon challis in teal, acid green and white with a 100% cotton voile in greens, blues and purple to make a midi length dress with a mandarin collar, elastic waist and 3/4 length rolled sleeves.  The yoke of the dress has pin tucks, a trio of antique buttons and delicate blue and green ribbon trim.  It's a fun and feminine dress for a day of antique shopping.

My daughter took all of these pictures for me.  We love hanging out in "The Circle."


Hah!  I took a picture of the photographer.  Isn't she cute?


Please check out all of the lovely submissions in the FabricMart Fabrics Fabricista challenge on their blog.  


Monday, October 28, 2013

Fabricista Sewing Challenge #6

Here's challenge #6 in the FabricMart Fabricista Challenge:


Fabric of OUR Choice
Surprise!
A box of beautiful fabric just showed up at your door and you need to make something to wear this weekend! For this challenge, you should have received two panels of poly chiffon in the mail. You will need those for this challenge!

You will have one week to complete this challenge.
Challenge: Using the fabric we have selected for you, challenge yourself by making a unique garment and working with a material you may not have used before to create one well-made garment. You can use a pattern of you choice to construct your garment. 
You will be judged on creativity, functionality, craftsmanship, and fit. 

Here's the fabric panel:


Here's my submission:


Well….when I opened the envelope and found this fabric, I didn't know what to think.  I love the colors and the stripes look like maypole ribbons, but it's a large print with a busy border and it's not yardage but two scarf panels.
  

It can be challenging to make a large print flattering and even more challenging trying to make a border print work so deciding on the design was definitely the hardest part.   I started thinking about what Stacy and Clinton would say (from "What Not To Wear") and knew they'd say large prints are good in a simple design and…. keep the stripes vertical.  So that's what I did.  I loosely based the pattern on a top I love that my mom gave me a few years ago (thanks mom!) and put the border print at the hem so the stripes would be vertical.


 I rolled the hem on the sleeve and hem and added a wide smocked bottom which added shape to flatter but kept the blouse flowy. I added pleats and bias binding to the neckline and finished the neck with hand-rolled bias tubing.  All of the seams are french seams for a clean look through the sheer fabric. I love this blouse and hope Stacy and Clinton approve.  I'm hoping to wear it to a nice dinner very soon….hint, hint. 

Head over to the FabricMart blog and check out all of the entries.

Saturday, October 26, 2013

Challenge #5 - I Won!


I won!  Thank you for all of your support in this challenge!

I'm off to work on Challenge #6.....

Sunday, October 20, 2013

Fabricista Sewing Challenge #5 - Timeless Classics

So here it is..... project #5 in the Fabric Mart Fabricista Challenge. Here's the challenge:

Challenge: Sewing a garment from a vintage pattern is challenging. The pintucks, pleats, and precise fit can be difficult to master. Choose a vintage pattern and modernize the piece. You can modernize your piece with styling, embellishment, or fabric. 
You will be judged on difficulty, craftsmanship, how fashion forward your look is, and FIT!
Take your time, you will have two weeks to make it perfect!


We were given two weeks to complete this challenge and I needed it.  I pulled this rayon blend brocade out of my stash and thought it was the perfect (and thankfully softer and drapier) homage to the brocades of the sixties. 


Since time is of the essence in these challenges, I immediately hit the internet for a vintage pattern and found a beautiful one at Retromonkey on Etsy and they shipped it quick (same day.....thank you so much!).  One of my favorite parts of this challenge was opening the pattern.  All of the pieces were there and had been meticulously cut and marked by the previous seamstress.  I know it's nerdy but it made me happy to use a pattern that someone else had taken such care with.  Sewing is an amazing tradition.   


Fit is one of the criteria for judging so I took my time making sure it was just right.  I lowered the neckline, widened the collar and made a slight aline skirt with darts instead of pleats (much more flattering on my body.)  I put in a side seam invisible zipper and shortened the sleeve from the original pattern. 


For detail I added a front placket with peau de soie piping and covered buttons.  I matched the fabric on the fronts and placket so the entire bodice is one continuous design.  Although I made all of these changes I still feel that I stayed true to the "wiggle dress" feeling of the pattern while making the dress wearable for me.  I'm not a sewer to sew something for sewing's sake....I wanna wear it.


 My constant sewing companion, Jack.  He loves retro dresses!


Please take a look at all of the other submissions from some very talented ladies at the Fabric Mart Blog.  Voting starts Tuesday.

I can't thank all of you enough for your kind comments and encouragement.  It's been a great experience!  By the way, editing all of these photos of myself has been quite painful.  It's been difficult to crop out saggy elbow skin (why didn't you tell me?) and frizzy hair.   To my dear friends:  I want to both thank you for not telling me how bad it is and reprimand you for not being real friends and nominating me for a makeover or at least a deep hair conditioning.  


All my best,

Diane