Friday, February 26, 2016

My First Spring Sew - TNT Pattern McCall's 6744


We've been hit by a heat wave here and the weather quickly turned my focus from winter sewing to spring sewing even though I have a couple of projects left for winter.  I saw this fabric and couldn't resist.


I used McCall's 6744 View C, a TNT pattern that goes together quickly and is really comfortable.  I feel like it's dressy without being fussy and it works in the heat.  Whew!

Last time I made it I made a skirt with no slit but this time I made it just like the pattern.  This ITY knit from Fabricland (the store I teach at) is black, white and coral.  The fabric flows nicely without clinging but all that flowing can make the slit come open a little more than I like.  I'll sew down the opening about 5" to remedy this...I don't want to surprise anyone.  Uh-hem.

I used a twin needle to finish all the hems and the neckline, and added 5/8" wide fusible knit interfacing to stabilize the front opening.  It keeps it's shape without stretching as I'm wearing it.


It looks like the weather will stay warm for at least another week so I'll be able to enjoy it.

Have you started spring sewing?

Diane


Tuesday, February 23, 2016

Dover Jacket Sew-Along #4 - 8 Things Every Sewer Should Know


It’s day #4, the final day of the Dover Jacket Sew-Along.  Our jacket is almost there and now it’s just the finishing touches.  Today we will cover the last three skills in “8 Things Every Sewer Should Know”: topstitching, buttonholes and sewing buttons on by machine.


We are on to hemming the jacket.  We will be adding interfacing to the hem of the jacket.  This is not a usual step in most sewing but I find it gives a professional finish on the hem of some projects.  On the wrong side of the hem of the jacket, fuse the 2 ½” strips of interfacing you cut earlier  (details on how to fuse interfacing are in Day #2 of the Sew-Along).  Repeat for the sleeves using the 1" interfacing strips.

To make the hem, fold up ¼” and press, then fold along the hem allowance and press.  Do this on both the hem of the jacket and sleeves.


To make a clean corner at the bottom of the your jacket, fold back the facing against the jacket front, right sides together and stitch along hem line.


Cut excess fabric out of the corner.  Turn and press.  Looks pretty clean, right?  Pin the hem in place.


Sewing Skill #6 – Topstitching

Now that your facing and hem have been prepped and pinned, it’s time to topstitch.  There are so many creative options here including contrast thread, matching thread or any number of hand stitches.  I’ve chosen matching thread for my red jacket but I used contrast thread and a decorative stitch here on this denim Dover.


If you’re new to sewing, I suggest you use matching thread (it hides imperfections a little bit better).  And if you choose a decorative machine stitch, keep it light.  Heavy decorative stitches can drag through the machine and get caught up.  And honestly, there are few things more frustrating than taking out decorative stitches.  It’s possible I know this from experience…eh-hem.  So choose a pattern that's on the light side.


The key to making topstitching look good is marking (which we did in Day #2), pinning and feeding the layers evenly through the machine.


I use the built in “walking foot” for my machine here because it helps all layers stay in place.  If you don’t have access to a walking foot, be sure to pin close together to keep the layers from slipping.  Stitch on all topstitching lines and along the hem.  Stitch sleeve hem in place.

Sewing Skill #7 - Buttonholes


It’s time for buttonholes.  I know you’re afraid but stay with me here...you've come this far.  I will be using the automatic buttonhole on my Janome 6600.  This is a pretty standard foot so chances are if you have a automatic buttonhole option on your machine, your foot will work pretty much the same way.  Buttonholes have already been marked so lets get started. 


Place your button in the buttonhole foot by pulling apart the buttonhole slide on the back of the foot, put the button in and close the slide so it holds the button in place.  Put the foot on the machine.


A really important note here:  Typically when we sew, the machine pulls our fabric away from us toward the back of the machine.  When sewing buttonholes, the sewing machine will feed the fabric toward you.  Just the opposite of what we are used to.


In this photo, we are looking at the top corner of the jacket.  We will start the buttonhole at the "T" mark and the machine will sew back along the white line.  

Sometimes I find fabric drags as it goes through the machine during the buttonhole.  To help with this, I add a small piece of tear away stabilizer to the back of the buttonhole.  After I'm finished I tear it away.  This is especially helpful when using a knit.

Take a scrap of fabric, double it and make a practice buttonhole:
1.  Put your needle in at the "T"
2.  Place stabilizer under (if you feel it's needed)
3.  Bring your bobbin thread up through your fabric so both threads are on top (this is optional but it does keep threads from knotting up on the back)
4.  Sew

You should know, I make a practice buttonhole on EVERY one of my projects.  It's worth the time....once again, better than taking out buttonhole stitches.

When you're happy with your practice buttonhole, continue making all buttonholes on the jacket. 

Here's a finished buttonhole.  How'd it go?


We are on the last step....putting the buttons on!  


Let's start by marking the buttonhole placement.  I found the easiest and most accurate way to mark button placement is by aligning the front edges of the jacket.  In this photo, the right side of the jacket is laying directly on top of the left side of the jacket.  Place a pin straight through the middle of the button all the way to the left side of the jacket.


Turn the jacket over to the left side and make a mark, with a fabric pen, where the pin came through.  This is where your button will be sewn on.  This marking method ensures the button is placed perfectly in the middle of the buttonhole.  

Sewing Skill #8 - Sewing Buttons By Machine

I bet you're excited about this one because if you're like most people, you find sewing buttons on by hand very tedious.  You'll be happy to know it's really easy!


Prep your machine: drop the feed dogs on your machine and put your machine on a zig zag stitch.  You can use your regular sewing machine foot or a special foot made for sewing on buttons.  I just use my regular foot.


Put your button directly over your pen mark and place it under the machine with the holes of the button visible through the foot.  Adjust the width of your zig zag stitch so the needle goes through both the left and the right hole. Test using only the hand wheel of your machine.  Adjust and test until you're happy with the placement.  Sew.

Since the feed dogs are in the down position, the stitches will be made in place.  I usually go back and forth 8 times for a really secure button.  When you are finished, you can pull both threads to the back and tie a knot.


That's it.  Now that you have the zig zag set up you can repeat with all other buttons without making any other adjustments.

This method of sewing on buttons is particularly helpful when you have lots of buttons to put on like on a shirt.

You are finished!!!!  Yay!

Share what you make by joining our Dover Sew-Along Flick Group.  We'd love to see it!

Thanks for sewing along!  

Diane

Friday, February 19, 2016

Dover Jacket Sew-Along #3 - 8 Things Every Sewer Should Know


It's day #3 of the Dover Jacket Sew-Along and we are taking our jacket to the machine today as we construct the body of our garment.  We will learn how to make even gathers, the importance of clipping and understitching (what is it?)

Pull out the instructions for View B, we are taking this one step at a time.  Keep in mind, all seam allowances are 1/2" and I am using a serger to finish my seams.  Pick whatever seam finish works best for you.


To begin, staystitch the neckline of the fronts, back and sleeves using a regular straight stitch at the 1/2" seam line:

Sewing Skill #3 - Gathering

On both fronts and on the back, make two rows of stitching between the notches.  Use long stitch length (a 4 or 5 on most machines) and stitch 1/2" from raw edge and again 3/8" from raw edge.  Leave the thread tails long.


With right sides together, pin the upper front to the front, pinning at edges and notches only.  Don't add any other pins at this point (don't worry that the raw edges don't match up).  Grab two thread tails (from the long stitches you made earlier) and gently pull them so the fabric gathers up to fit along the upper front.


At both notches, anchor the threads by wrapping in a figure 8 shape around the pin (this will keep your gathers from "falling off"). Now that your stitches are anchored, you can move the fabric along the threads to make them even. Pin every 1" along gathers.


Stitch in place.


Repeat for other front and back.  Press seams up.


With right sides together, stitch front to sleeves at armholes seams.  Repeat for back.  Press seams toward sleeve.

To make sleeve dart, put dart legs right sides together and stitch in place, sewing all the way to the point of the dart.  Press darts toward the back (using a pressing ham will help when pressing the dart).


With right sides together, stitch front to back at sides, from the end of the sleeve to the jacket hem.  Press seams toward the back.

Your jacket is already looking like a jacket, right?


With right sides together, stitch front facing to back facing at neck seams.


Pin facing to jacket, right sides together.  Stitch in place, pivoting at the top of the neck.

Sewing Skill #4 - Clipping

Clipping is another one of the those skills sewers want to skip but seriously folks, there is no other way to make a curve lie flat.  So whenever you have a curve, take the end of your scissors and cut through the seam allowance (clip) to the stitching line but not through the stitch.  The tighter the curve, the closer together your clips need to be.


On your jacket, trim the seam allowance to 3/8" and clip the corners off at the top of the neck at your pivot.

Clip along the neckline edge about every 1".  Flip facing to the inside.

Is it lying flat around the curve?  If not, you may need a few more clips.  Press the facing in place.

Enjoy your handiwork, it's looking' good!

Sewing Skill #5 - Understitching

Now I know plenty of people that have been sewing for years and have never understitched. It's one of those skills that can change a garment from looking homemade to professional and it's really simple.

An understitch is a line of stitching close to the neckline edge on the facing.  It makes a facing want to lie flat. I don't know the physics of it but I know it works.


To understitch, make a line of stitching 1/8" from the neckline edge through the facing and all seam allowances but leaving the jacket front free.  I use a ditch foot to help me stay straight but you can use a regular machine foot.

On the Dover Jacket, understitch from the hem of the jacket as far up the front as possible (you can't stitch all the way because of the corner), continue around the neckline as far as possible and finish up stitching from the neck down to the hem.


Flip your facing back and see how beautiful it is.  You can use this technique around necklines, at waistbands and near linings.  I find most of my projects have an area that would benefit from understitching.

We are powering through this Sew-Along and we will finish it up in our next installment.  Dover Day #4 is February 23.  Keep asking questions!  I'm happy to help.

Thanks for sewing along!

Tuesday, February 16, 2016

Dover Jacket Sew-Along #2 - 8 Things Every Sewer Should Know


We are on to day #2 of the Dover Jacket Sew-Along and today we are prepping to sew.  By now we have gathered together our pattern, fabric and notions and we are ready to go. Today we will print the pattern, tape it together, pin, cut and mark our pattern and apply the interfacing.

Start by printing out the test square page of the Dover pattern package, page 29, to verify your printer settings are correct.  Be sure the printer is set to print at "actual size" and not "fit to page".  When your printer settings are verified, print pages 11-40 for just the pattern pieces or all pages if you want a hard copy of the instructions.

Taping together a PDF pattern can be daunting but really it's a whole lot faster than finding time to get to the fabric store and pick up a pattern OR a lot less expensive than having it shipped (I'm not going to even get into the instant gratification a PDF offers.)  I have a tutorial here on the fastest way to tape together the PDF.


After everything is all together, cut or trace the pattern on the size you have chosen and pull out the instructions for View B.  Blue Dot Patterns have separate instructions for each view of the pattern. Follow the pattern layout for the width of fabric you are using and pin all pieces down making sure to keep grainlines parallel to the selvedge and "cut on fold" pieces along the fold of your fabric.  Cut all of the pieces out (but keep your pattern pieces pinned on to your fabric.)

Sewing skill #1:  Marking Pattern Pieces

This is an essential step and in my experience as a sewing teacher, the one that students most want to skip.  I can tell you, taking the time to mark your pattern now will save lots of heartache and time in the end.  There are a myriad of ways to mark and I'll show you a few here.

Notches:
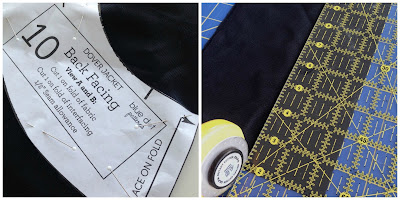
The short lines along the edge of the pattern are called "notches".  On most commercial patterns, notches are triangle shaped but on Blue Dot Patterns they are simple straight line 1/4" long.  To mark, take the end of your scissors and clip just to the end of the line.  In addition, be sure to make a clip at all center fronts and center backs of any project (see photo on the right). These clips will help you line up the pieces throughout construction.


Tracing paper:
One way to mark stitching lines, darts, pocket placement, buttonhole placement or any number of markings on the body of a pattern is tracing paper.  It's a method that's been around forever and the supplies are really quite inexpensive.  You'll need tracing paper (paper with chalk on one side, sold by the package) and a tracing wheel.  The wheels come either smooth or serrated.  I find the serrated leaves a more visible line than the smooth but you definitely need the smooth wheel for delicate fabrics that could be damaged by the serrations.

To mark:  Place the tracing paper chalk side down on your fabric and under your pattern piece.  Take your tracing wheel and firmly run the wheel along the marking lines on the pattern.  For Dover, this method works well for buttonhole markings and topstitching lines.


Chalk:
Another option for marking patterns is chalk.  It comes in lots of forms including pencils and squares.  I will be showing the Chaco Liner.

To mark the topstitching lines and buttonholes, measure how far in the marks are on the pattern and using a ruler, transfer the marks to the fabric by rolling the liner along the ruler.  Often times, this gives a sharper mark than tracing paper.


Sewing Skill #2 - Interfacing

What is interfacing and why do we want to use it?  Interfacing is a stabilizer that is added to a fabric or garment to provide structure or stability.  We need it in many places including: shirt plackets, collars, facings, hems and anywhere fabric needs to be shored up.  It comes in different forms but are primarily divided into fusible (iron on) and sew in.  Both are used for different reasons but whenever I can use fusible, I do.


Cut facing pattern pieces out of interfacing and cut interfacing strips 2 1/2" wide for the hem and 1" wide for the sleeve.


Using a light iron, place the bumpy side of your interfacing pieces down on the wrong side of the facings, lining up the edges evenly.  Place a pressing cloth or thin piece of fabric over the interfacing and iron gently on the cloth.  It's best to use an up and down gentle motion with the iron (pressing) as opposed to pushing down and moving the iron back and forth (this can make your fabric stretch and your interfacing move).  The strips of interfacing for the hems will be used later.


If you have questions, leave a comment and I will do my best to answer them.

Whoo-hoo!  We are done for the day!  Day #3 of our Sew-Along will be on February 19th.  See you then!  


Friday, February 12, 2016

Dover Jacket Sew-Along #1 - 8 Things Every Sewer Should Know


Welcome to the Blue Dot Patterns Dover Jacket Sew-Along!  Today is part #1 of a 4 part series.  Today we will be talking about selecting fabrics, gathering supplies and choosing pattern size.


Fabrics:
Well, for me this is usually the best part!  The Dover Jacket is pretty versatile therefore you are able to use a myriad of different fabrics (maybe even something from your stash, which is always a good thing!)  The recommended fabrics include: ponte knit (my fabric of choice for the sew along), raw silk, linen, lightweight wool, quilting weight cotton, and light to medium weight denim.  Check out my Dover Sew-Along Pinterest board for lots of other options.  For View B you will need 2 1/3 yards of 45" fabric OR 1 5/8 yards of 60" fabric.

Solid or almost solid fabrics would work really well if you want to focus on the topstitching.  Here's a dot denim and an ivory ponte knit from Finch Fabrics that would be great for topstitching:

These linens from Fabrics Store would be perfect for spring paired with some really great buttons:
Fabricworm quilting cottons would sew up well for a fun jacket.  And aren't we always looking for a reason to use these print fabrics?

Notions:
 We will be making The Dover Jacket View B so we will need: 
  
1 yard of fusible interfacing
Three 1" buttons
Thread to match or contrast (depending on if you do a contrast topstitch)

The interfacing will be used on the jacket facing and the hem.  Iron-on or fusible interfacing works well.  I typically choose a knit interfacing because it adds stability while keeping the drape of the fabric.  Pellon type interfacings work on stable wovens but be sure to keep them lighter weight than the fabric itself.


On my jacket I used 1" denim covered buttons from my stash.  There are only 2 because that's all I had and they looked so great (and I've been dying to use them) I couldn't resist.  It's my sewing party so I can can make some changes, right?   This is the perfect time to use those funky buttons you love but can't seem to find a project for.
Pattern Size:

The back of the pattern lists both body measurements and finished garment measurements.  To choose the correct size for you, measure your bust at it's fullest point and compare it to the body measurements chart.  This is the size you should choose.  If you are in between sizes, size up.  When you compare the body measurements to the finished garment measurements you can see there's 2" of ease built into the bust 9" of ease at the waist.  If you prefer more space in the bust be sure to size up.  After all, this is your jacket.

Okay, collect your PDF pattern, fabric and notions and let's get ready to go!  

Day #2 of the Sew-Along is February 16th and we will begin prepping to sew.  

See you soon!